Overview
In the mail settings, you control the automated e-mail communication with your customers. You decide which system mails your customers receive, who gets a copy via BCC, which PDF documents are attached, and via which route the e-mails are sent. This guide takes you through the configuration step by step.
Note
You can configure the mail settings both in the contracting company and in the client. The settings of the contracting company apply to all clients. If a client needs different settings, you can override the contracting company's settings in that client.
Before you begin
You have access to the settings of the contracting company or of the client in the Merchant Backend.
If you want to send e-mails via your own domain or SMTP server, you have access to the DNS settings of your e-mail domain or the access data of your SMTP server.
Step 1: Open the mail settings
Decide on which level you want to configure the mail settings:
Contracting company – the settings apply to all clients. Open Settings → Mail Settings.
Client – the settings apply to this client only. Open Settings → Applications → Mail Settings.
On both levels, the mail settings are divided into three tabs: Mail Settings, Dispatch Route and Manage PDF Attachments.
Override the contracting company's settings in the client
If you configure the mail settings in the client, you first need to override the settings of the contracting company:
Click Edit.
Set the toggle Use these settings instead of contracting company's settings to active.
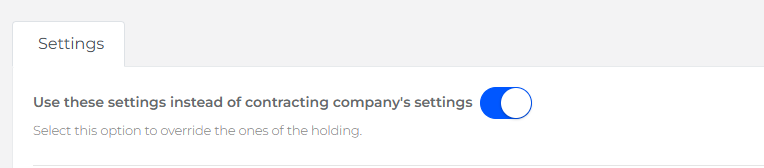
The toggle applies to all three tabs, so you only need to set it once. As long as the toggle is inactive, the client uses the mail settings of the contracting company.
Step 2: Understand system mails
System mails are e-mails that Frisbii Media sends to your customers automatically when a certain event occurs – for example, when a customer places an order, an invoice is created, a payment fails or a customer registers. Depending on the system mail, the trigger comes from the Merchant Backend, the Checkout, the Self Service, the SSO or the system itself.
You can customize the content and design of each system mail in the e-mail templates. If you don't make any adjustments, Frisbii Media sends a standard template that automatically uses your company data. For more information, see E-mail templates (client) and E-mail templates (contracting company).
Note
If you use an external SSO for customer management, the system mails with the source SSO are not sent by Frisbii Media. Implement these e-mails in your external system.
Available system mails
System mail | Trigger | Possible sources |
Subscription paused | The subscription pause is activated – the mail is sent when the pause is set, even if the pause starts in the future. | Merchant Backend, Self Service |
Subscription pause ended | The subscription pause is deactivated. | Merchant Backend, Self Service |
Subscription delivery was paused | A delivery break is activated, even if the delivery break starts in the future. | Merchant Backend, Self Service |
Subscription delivery pause was ended | The delivery break is deactivated. | Merchant Backend, Self Service |
Subscription cancellation confirmation | The subscription is cancelled. | Merchant Backend, Self Service |
Confirmation of cancellation reversal | A cancellation is withdrawn before the end of the current subscription interval. | Merchant Backend, Self Service |
Offer change due to cross-selling | An offer is terminated through cross-selling. | Checkout |
Purchase through up/down-selling | An offer is purchased through up- or down-selling. | Checkout |
Order | An order is completed that does not trigger an invoice or includes free products. Includes the PDF order confirmation. | Merchant Backend, Checkout |
Invoice | A recurring payment is completed successfully. Includes the PDF invoice. If an order results in an invoice, this mail is sent instead of the Order mail and also includes the PDF order confirmation. | Merchant Backend, Checkout, System |
Voucher purchase | A voucher offer is purchased. Includes the PDF voucher. | Checkout, Merchant Backend |
Payment failed notification | The customer revokes a payment that was already successful, or a comparable situation occurs. | System |
Notification of a failed payment attempt | A single payment attempt in an accounting period fails. | System |
Notification of a failed recurring payment | All payment attempts in an accounting period have failed. | System |
Change of payment method | A new payment method is stored in the customer account. | Merchant Backend, Self Service |
Registration completion | The registration process is started. Contains a security token (valid for 1 day). | SSO |
Registration confirmation | The registration process is completed successfully. | SSO |
E-Mail already used for registration | An e-mail address that already exists in the system is used for registration. | SSO |
Welcome email for customers created via the merchant backend | A customer is created manually in the Merchant Backend. | Merchant Backend |
Reset password | The forgotten password process is started. Contains a security token (valid for 15 minutes). | SSO |
Reset password confirmation | The password is updated successfully. | SSO |
Email change confirmation | The process for changing the stored e-mail address is started. Contains a security token. | Self Service |
Invitation to a multi-user offer | Multi-user access data is sent to a user. Contains an invitation code. | Merchant Backend, Self Service |
Multiuser Added User (new feature version) | An existing user account is added to a subscription. | Merchant Backend |
Multiuser Invitation (new feature version) | A new customer who is not yet known to the system is invited to use a subscription. | Merchant Backend, Self Service |
Payment Receipt | A customer places an order, or a recurring payment. | Merchant Backend, Checkout |
Step 3: Activate the mail setup and select your system mails
In the Mail Settings tab, you decide which system mails are sent to your customers.
Open the Mail Settings tab and click Edit.
In the table, activate each system mail that you want to send to your customers.
Deactivate the system mails that you don't need.

Deactivated system mails are no longer sent to your customers.
Step 4: Send copies via BCC
With the BCC function, specific people or departments automatically receive a copy of selected system mails. For example, your accounting department can receive a copy of every invoice mail sent to your customers, while your customer success team receives all e-mails about registrations, cancellations and similar events.
Set a BCC address for all system mails
In the Mail Settings tab, enter the e-mail address in the field Send BCC emails to the following address, for example the address of your customer success team.
In the table, activate BCC for each system mail that should be sent to this address, for example Subscription cancellation confirmation, Registration confirmation and Welcome email for customers created via the merchant backend.
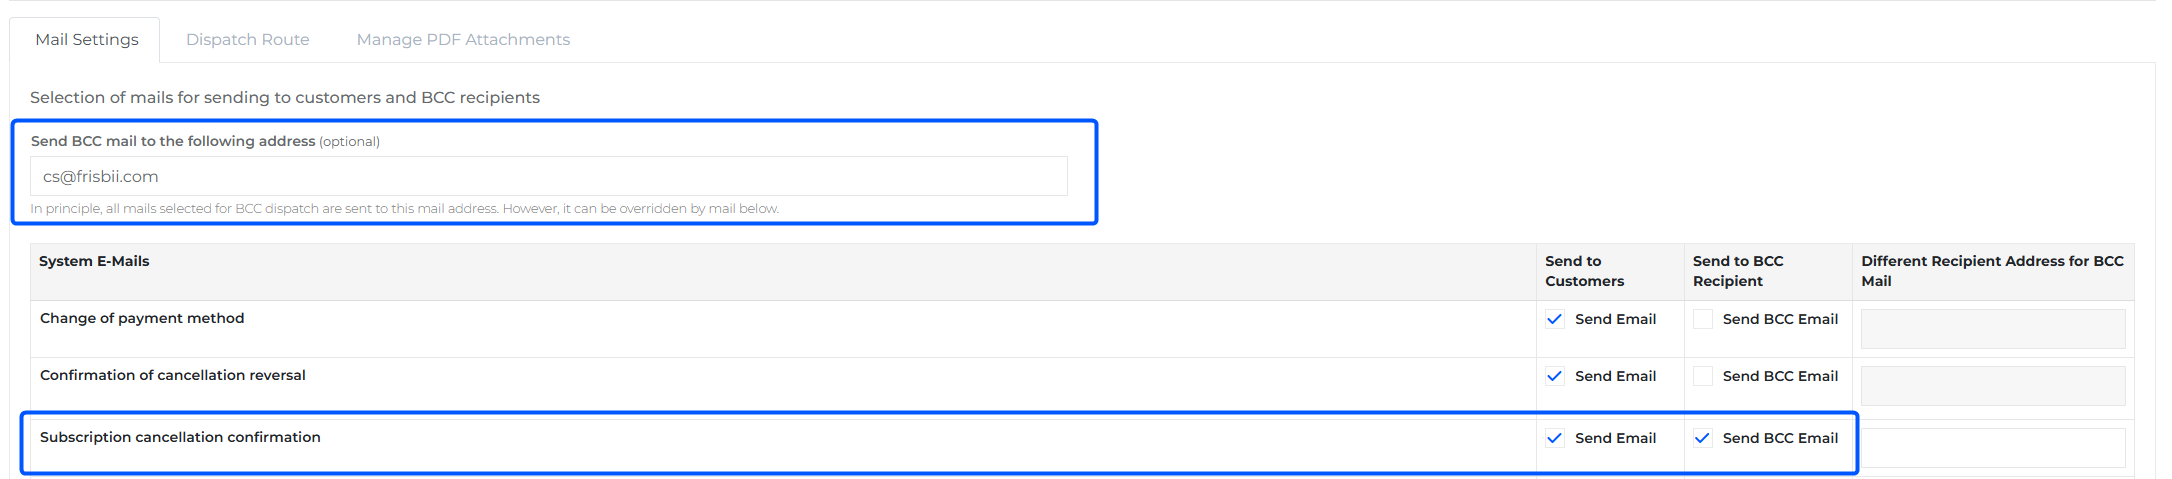
The BCC address only receives the system mails for which you have activated BCC.
Use a different BCC address for a single system mail
For each system mail, you can enter a different BCC recipient in the table. This address overwrites the general BCC address for this system mail only.
Example: The invoice mails and the payment receipt mail should go to your accounting department.
In the rows Invoice and Payment receipt, activate Send BCC mail and enter the address of your accounting department as Different recipient address for BCC mail.
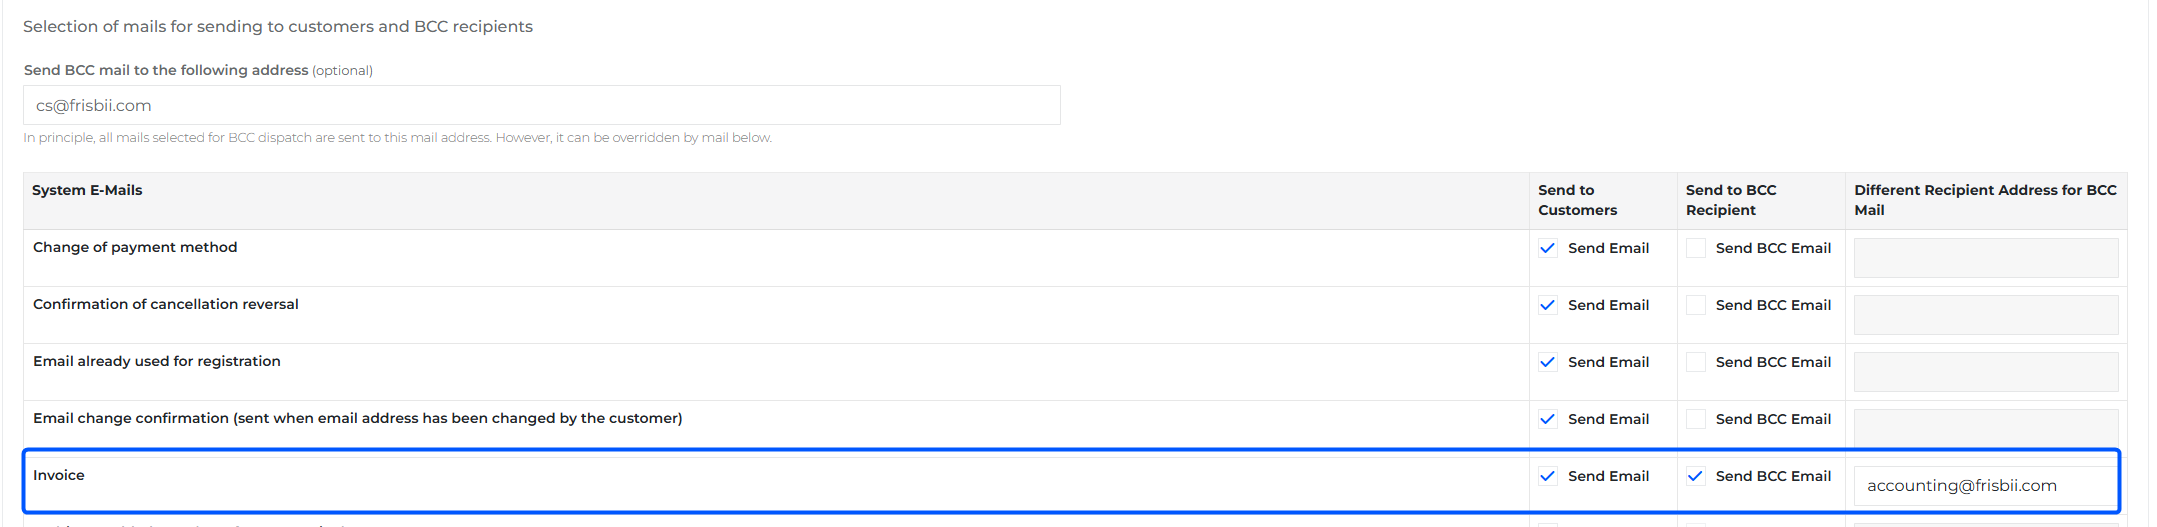
The Invoice and Payment receipt mails are now sent only to your accounting department, while all other system mails with active BCC still go to your customer success team.
Restrict sending to a recipient domain
Under the other settings in the Mail Settings tab, you can restrict the sending of e-mails to a specific recipient domain.
In your staging environment, restrict the sending to your own company domain. This way, test e-mails never reach real customers.

Step 5: Manage PDF attachments
Some system mails include PDF attachments. For example, the Invoice mail includes the PDF invoice, the Order mail includes the PDF order confirmation and the Voucher purchase mail includes the PDF voucher. You decide whether these PDFs are attached – separately for private customers and business customers.
Open the Manage PDF Attachments tab and click Edit.
For each PDF, select the checkbox for private customers and/or business customers to attach the PDF.
Clear the checkbox if you don't want to attach the PDF for this customer type.
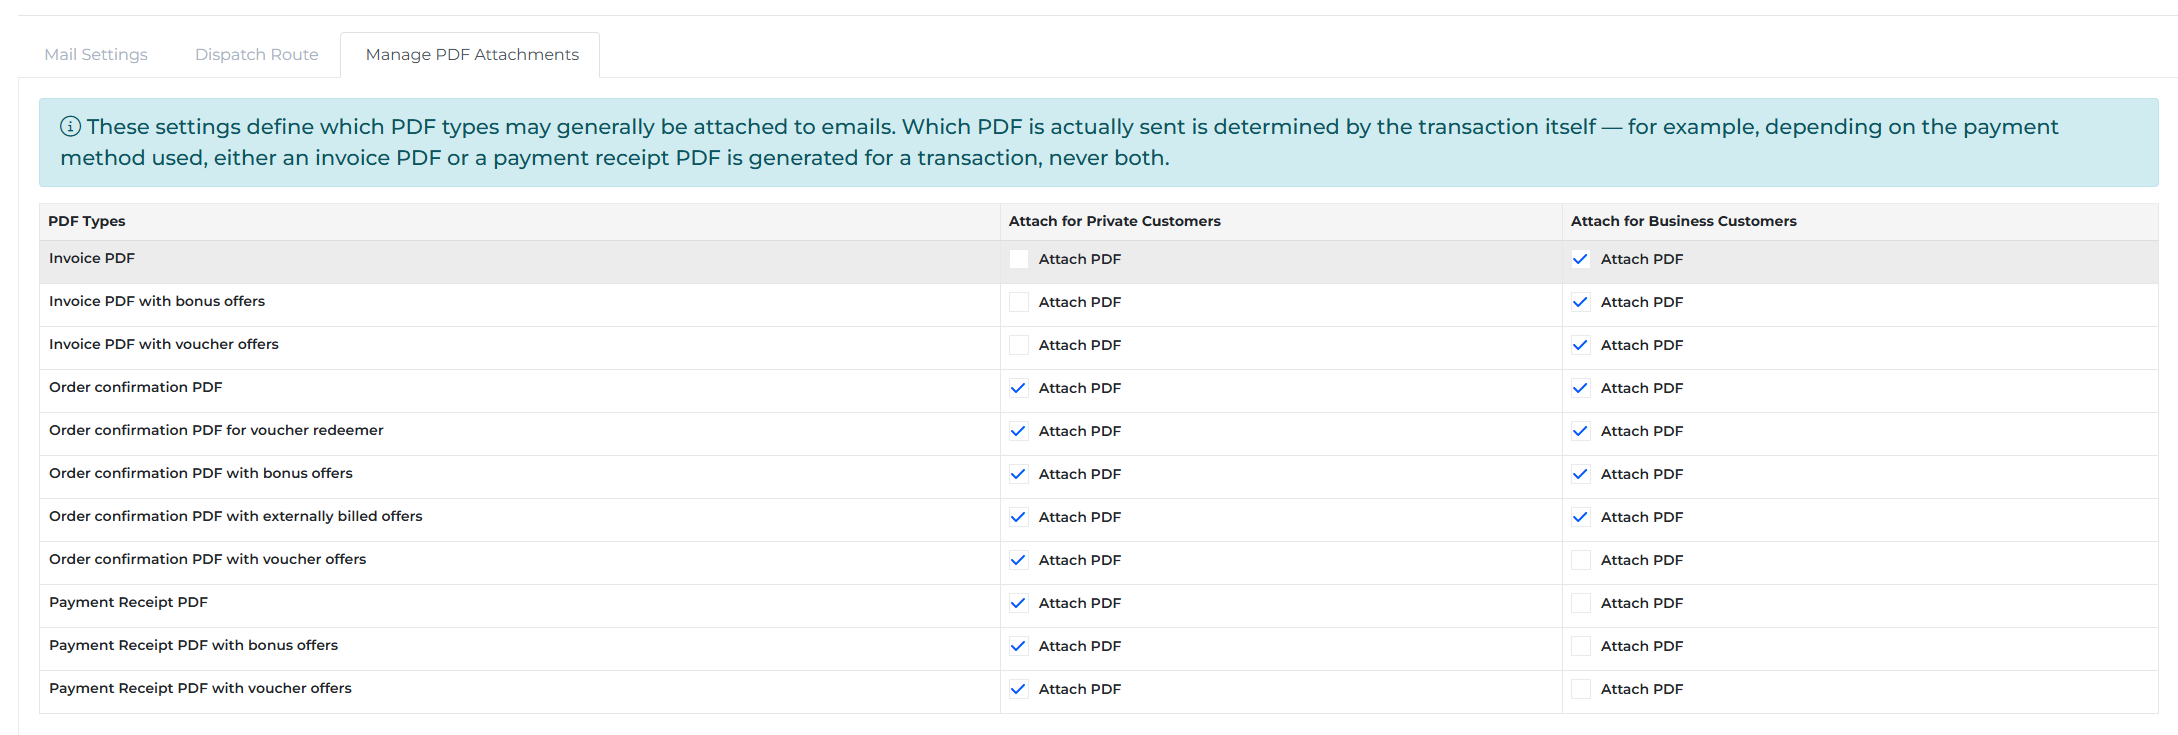
Example: Business customers receive the PDF invoice attached to the invoice mail, while private customers receive the invoice mail without attachment.
Step 6: Choose the dispatch route
In the Dispatch Route tab, you define how your system mails are sent and which sender e-mail address is used. Select the option in the field Selection of the dispatch route. Frisbii Media offers three dispatch routes:
Dispatch via Frisbii Media domain (default)
By default, all system mails are sent via the Frisbii Media domain. The sender addresses end with onplenigo.com. You don't need to configure anything for this route. For more information, see Dispatch via Frisbii Media domain.
Dispatch via SMTP server
Frisbii Media sends the system mails via your own outgoing mail server. To connect your SMTP server, fill in the SMTP fields with the access data of your server. Frisbii Media then has full access to compose and send e-mails from this mailbox. For more information, see Dispatch via SMTP server.
Dispatch via domain delegation
Frisbii Media sends the system mails in the name of your own e-mail domain, for example yourcompany.com. This makes your e-mails look more professional and strengthens your customers' trust.
In the field Selection of the dispatch route, select Sending via domain delegation.
In the field Sender E-mail address, enter the sender address.
In the field E-mail domain, enter your domain without www. The sender address must belong to this domain.
Open the new Mail Delegation tab and transfer the listed SPF entries and DKIM information to the DNS settings of your e-mail domain.
Contact support@frisbii.com to have your e-mail domain approved.
When the DNS entries are correct, a green checkmark is shown next to E-mail domain checked. After the approval by Frisbii Media, a green checkmark is shown next to E-mail domain approved. For more information, see Dispatch via your own e-mail domain.
Note
E-mails sent between switching to domain delegation and the approval of your domain still end with onplenigo.com. Complete the setup as soon as possible. Also check whether you need to update the support e-mail address in the client under Settings → Company Data.
Test your dispatch route
In the action bar, click Test Settings. Frisbii Media checks whether the technical requirements are configured correctly, in particular the DNS and authentication settings such as SPF and DKIM, and the relevant connections.
Note
The test only confirms a valid technical configuration – no e-mail is sent via your domain or infrastructure. For a complete end-to-end test, trigger a real system mail, for example by placing a test order in your Frisbii Media stage environment.
Next steps
You can customize the emails under Templates → Mail Templates.