Frisbii Media
Overview
A shopping cart lets your customers buy several offers in a single checkout. You combine offers in the Merchant Backend, decide which offers are mandatory and which ones the customer can add or remove, and then start the checkout with the shopping cart instead of a single offer. Before you go live, you can use the price preview to see exactly what a customer would pay for the cart.
Each offer purchased via a shopping cart is listed separately in the Merchant Backend and can be canceled separately.
Note
Shopping carts are the top level of the product structure: a shopping cart contains offers, and each offer contains one or more products. For details, see Connection between shopping cart, offer and product.
What you can do with shopping carts
Sell several offers in one checkout: your customer goes through the checkout only once, even when buying several offers.
Combine different offers: for example, subscriptions with different terms, or a subscription together with a single product.
Let customers choose: mark offers as optional so your customers decide in the checkout which offers they want. Optional offers can be preselected (opt-out) or not preselected (opt-in).
Manage purchased offers independently: each offer is listed and can be canceled separately after the purchase.
Include offers from other clients: add offers that another client shares with you via a cross-client connection. See Shopping cart for cross-client.
Check prices before going live: use the price preview to see the total price per country, currency and tax rate, or for a specific customer.
Reuse the same cart in several places: start the checkout with the shopping cart from your website, a landing page or the WordPress Connector.
Use cases
The following examples show typical shopping cart setups and how to configure them.
Use case | Example | How to configure it |
|---|---|---|
Optional add-on (opt-in) | A digital subscription with an e-paper the customer can add if interested. | Digital subscription: mandatory. E-paper: optional, not preselected. |
Upsell (opt-out) | An annual subscription with a supplement that is included by default but can be removed. | Annual subscription: mandatory. Supplement: optional and preselected. |
Subscription plus single product | A subscription combined with a one-off product, such as a special issue or a book. | Subscription: mandatory. Single product: optional or mandatory, depending on whether the customer may skip it. |
Fixed bundle | Two subscriptions with different terms that are always sold together. | Both offers: mandatory. |
Cross-client bundle | Your own offer combined with an offer from a partner title. | Add the offer shared via cross-client connection to the cart. Use the price preview to check the total price. |
Campaign-specific checkout | A dedicated cart for a newsletter or landing page campaign. | Create one shopping cart per campaign and link the campaign page to the checkout for that cart. |
Before you begin
You have created all offers you want to add to the shopping cart.
Create a shopping cart
Fields marked with an asterisk (*) are required.
Open Products → Shopping Carts.
Click + Add shopping cart.
Enter an Internal title*. The internal title helps you find the cart in the Merchant Backend and is not shown to your customers.
Select the Language of the shopping cart.
Enter the Title* that your customers see in the checkout.
Enter the Legal notice* for the shopping cart.
Optional: enter a Description.
Select an offer in the Add offer* drop-down list. Repeat this step for each offer you want to add.
For each offer, decide how it behaves in the checkout by setting Offer can be selected as an option and Option preselected in the checkout. See the table below.
To remove an offer from the cart, click the minus icon next to it.
Click Save.
The shopping cart now appears in the list view under Products → Shopping Carts.
How the offer options work in the checkout
Offer can be selected as an option | Option preselected in the checkout | Result in the checkout |
|---|---|---|
Not checked | Not available | Mandatory offer. The offer is always in the cart and the customer cannot remove it. |
Checked | Checked | Optional offer (opt-out). The offer is in the cart and the customer can remove it. |
Checked | Not checked | Optional offer (opt-in). The offer is not in the cart and the customer can add it. |
When you check Offer can be selected as an option, Option preselected in the checkout is checked automatically. Uncheck it if the customer should actively add the offer.
Example
The following settings were made in the Merchant Backend:
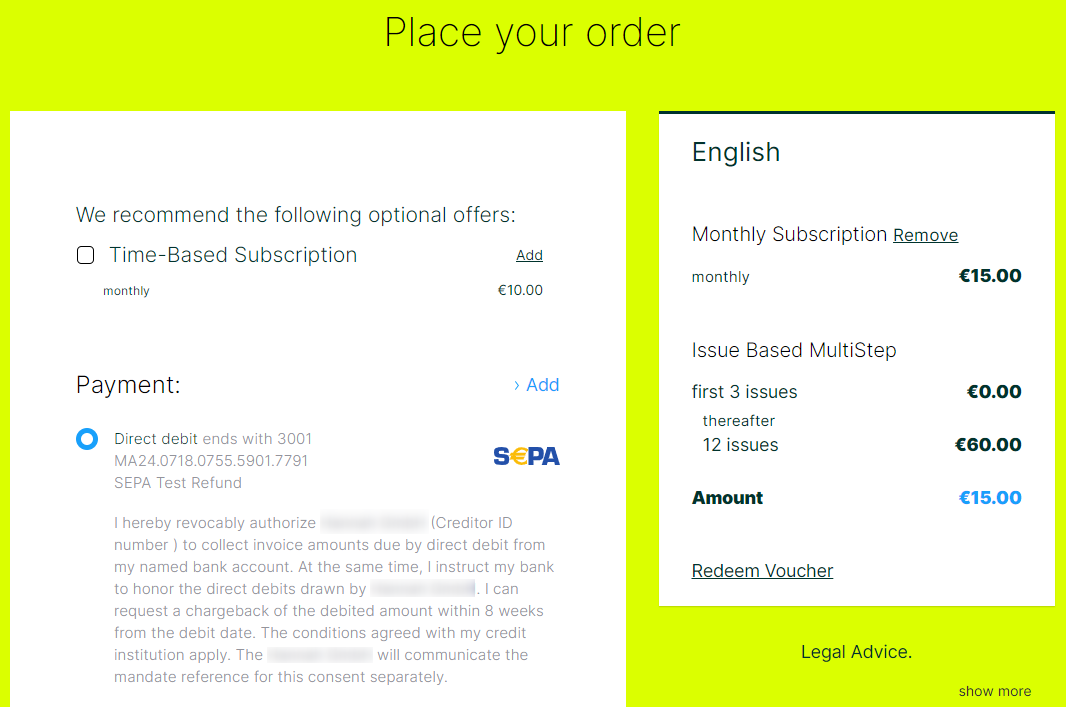
The first subscription can be added optionally in the checkout. The offer is not preselected.
The second subscription is preselected in the checkout and can be removed by the customer.
The third offer is the mandatory offer that the customer cannot remove from the shopping cart.

This is how the settings work in the checkout:
Preview the price of a shopping cart
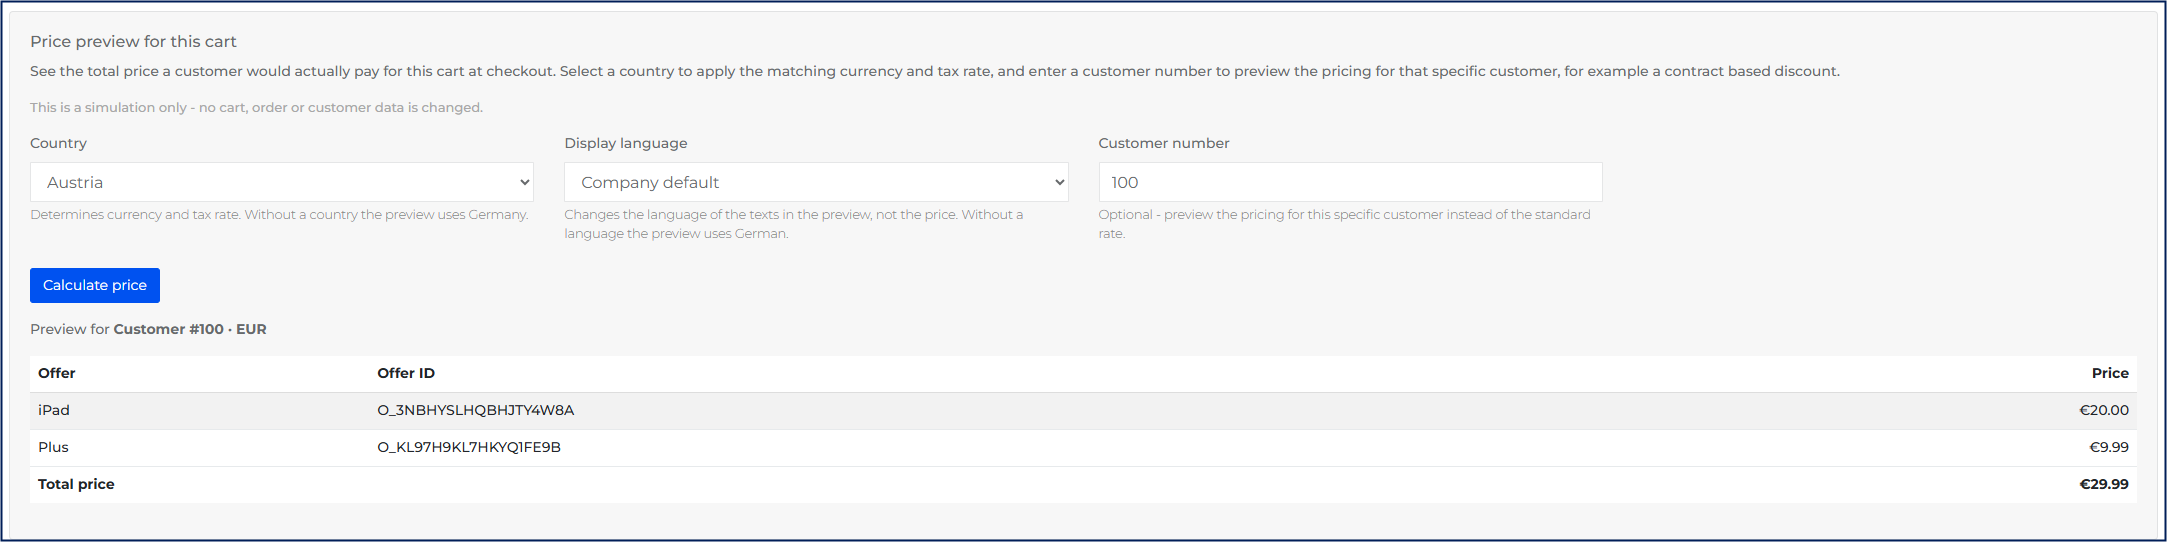
The price preview shows the total price a customer would pay for the shopping cart in the checkout, broken down by offer. This is especially useful for offers from other clients, whose prices you otherwise only see once the cart is opened in the checkout. You can also check prices for different countries or for a specific customer before you use the cart.
Note
The price preview is a simulation only. No cart, order or customer data is changed.
Open Products → Shopping Carts.
Open the detail view of the shopping cart via Commands.
Go to the Price preview for this cart section.
Select a Country. The country determines the currency and tax rate. To see prices in other currencies, for example CHF for Switzerland or NOK for Norway, you need to have configured these prices in the price sheet of the offer.
Select a Language.
Enter a Customer number to see the prices for this specific customer, for example including contract-based discounts.
Click Calculate price.
The preview shows the price of each offer and the total price. Above the result, you see the context the calculation is based on, for example the selected country and currency or the customer number.
You can fill in Country, Language and Customer number at the same time, for example to check what a specific customer would pay in another country.
Manage shopping carts
All shopping carts you have created are listed under Products → Shopping Carts.
Use Commands to open the detail view of a shopping cart or to edit it directly.
In the detail view, use the action bar to edit or archive the shopping cart.
What to do next
Start the checkout with your shopping cart. Your developers pass the shopping cart ID (for example
SC_UKKJH8KJHKJ) asbasketIdwhen preparing the purchase. See Checkout - Advanced Options.If you use WordPress, copy the checkout URL of the shopping cart in the WordPress Connector. See Using the WordPress Connector.